

Guest blog time folks, as we have a contribution blog from a good friend and local player of mine who wanted to show off his talents. Sit back and enjoy the article and be sure to give our guest some feedback on his article. – NB
My name is Chadi Faraj. I’ve never written a blog before but I figured I’d give it a shot since I can get a bit hysterical about the games I play.
A little history about myself; I’ve been playing table top miniature games, assembling models and painting for about 18 years now and have loved every second of it!
The reason I’m writing this article is that I felt like showing off some of the work I have been doing lately, maybe impart some of the tricks I’ve learned over the years, and more importantly learn new tricks from any comments and cool tip you guys may have for me.
So here goes nothing….. (Go easy on him kids, he’s fragile! – NB)
I figured I’d start with Bases. Like the name suggests the Base is the foundation and support of your model. So by giving it a bit of love and putting in a little effort the base can help to accentuate the model and unify a theme for your army of choice.
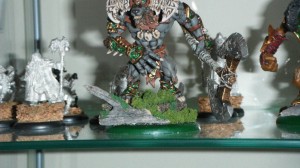
Let’s use my Circle of Orboros army as an example. I have recently started back into the Circle faction for the Hordes game made by Privateer Press.
Funny aside; Circle Orboros was the very first army I collected and played for Hordes back in the days of MK I, and I eventually grew tired of playing them and sold all of my models off when I needed the spare cash to fund some other hobbies and projects. When MK II came around I migrated to the Trollbloods faction and learned how to brick with the best of them. Favourite Warlocks like Borka gave my opponents fits, but I ultimately felt the Trollblood faction was too one-dimensional (AT THE TIME!) and so I craved a change. Our obnoxious and loud local Press Gang member (Also Handsome, witty, charming, sexy – NB), Northblade, encouraged me to get back into Circle Orboros, and so I came full circle (get it? Good thing I’m not a comedian right? :s ) back into the faction I started gaming with. (Never question my wisdom – NB)
First a list of the materials I use and a small blurb on their uses:
Cork:
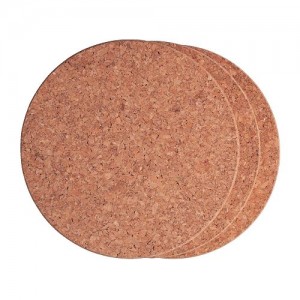
U.F.O. or basing material?
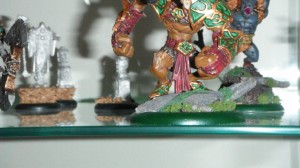
Cork is a great way help break up a flat base; you can get a pack of 3 x 7” diameter 1/2″ cork coasters at Ikea for $5 and the pack will last you a long time. Breaking up some small chunks of cork to create rocks or using big chunks to create boulders for your models to stand on to make them look more threatening are just a couple of examples of what cork can be used for. Another great use for cork is to support the pins you may need to use to anchor models in more dynamic poses like this Gorax Light Warbeast, this Warpwolf Stalker Heavy Warbeast or my Kromac the Ravenous, both of which are “pouncing” on their victims. I have a brass rod pinned to their foot travelling through the cork and into the metal base’s counter weight.
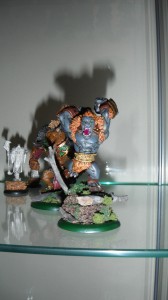
Great Galloping Goraxes, Batman!
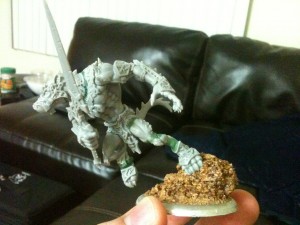
So stalky…
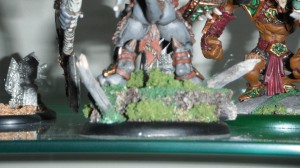
Flock:
In these examples I use moss flock and a touch of static grass; these materials are a simple but effective way to make things look a bit more natural and to add more colour to your base. I have also used regular sand to create the texture of the forest floor.
What does a Gnarlhorn Stayr wipe with when finished?
Now that we are familiar with the materials, how bout a nice step-by-step walk through on how to get them looking like this:
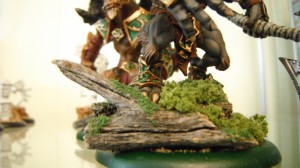
Pretty Forest Base is pretty
Before I start a project I look for inspiration, whether it comes from doing some online research or heaven forbid actually taking a walk outdoors and seeing how things look in nature. I know I know crazy talk right …. Actually in all honesty I got my inspiration for these bases when I went camping with some friends. Speaking of inspiration, be sure to use Google to search images when you are looking for inspiration, or better yet look through family photos from places you have seen on vacations that may have interesting scenic options like sand, rubble, different stone surfaces, forest or grass areas, etc.
After the muse has done her work I start by looking at the model I want to make the base for and see what would be the best way to have the the base complement the model. For example this Blackclad Wayfarer model, I wanted him to look like he was standing on a stone with the winds of the Devourer Worm flowing around him. So I broke off a chunk of cork with a slight angle to it. Then I stuck the model into the cork using the flash on it’s feet to help anchor it.
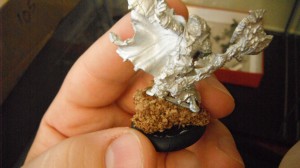
Here comes the rain…
The next step I water down some white PVA glue to a milky texture and apply it to the base where I want to have some sand texture. Once I have the coverage I want, I bury the base in a container full of sand, wait a couple of seconds then remove the base, making sure to shake the model afterwards to get off any extra sand and clean the cork up before it has time for the glue to dry. And then the waiting game begins. Watered down white glue takes forever to dry!!! I usually give it a good 2 hour to make sure it is fully dried. After the glue has dried I water down some more white glue to about a 1:1 ratio and dab it over the sand this second layer of glue helps hold down the sand, forming a protective layer and ensuring the sand will not get damaged with use or over time.
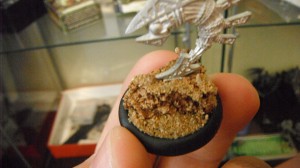
It puts the glue on it’s sand…
Next I prime the model (this also adds a layer of sealant like the second layer of glue). And then paint the model …. This step of the process takes even longer than waiting for the glue to dry. I’ve seen snails move faster then I paint but eventually I’ll get it painted. And now I can start focusing on the base again.
For these bases I start by base coating the entire base with a dark brown. I use Scorched Earth from the GW line of paints but any P3 equivalent colour will work well also, such as Umbral Umber. Then I dry brush a heavy coat of GW Desert Yellow which is a light sandy colour, or P3 Moldy Ochre or Rucksack Tan.

Look ma, sandy outcropping!
Next I figure out the best place for a “log” or a simulated “fallen tree”. This step will actually require us to take a walk in a park and find some twigs we can use. I glue the twig down using a dab of super glue and a small ball of green stuff to hold it down. Don’t worry if the green stuff isn’t completely hidden at this point we will fix that in the next step.
Sticks & Stones may break my bones….
… Goats will always Slam me!
Next I water down some more white glue and apply it to the base in some random spots that I think moss would grow naturally on, like the tree stump or on the rock face, and then pile on the green moss flock and give it a couple of minutes to dry. After waiting for it to dry, I shake off the excess flock much like with the sand. For the more clumpy moss foliage I put a drop of undiluted white glue on it and place it on the base. You will need to give this some time to dry. As long as the glue is wet the heavier flock will shift with the slightest touch but once the PVA glue dries it will create a strong bond.
Getty’s got back!
The last step is cleaning up the edge of the base. I paint it black to clean up any mistakes and then use a dark green to clearly mark the model’s front arc, for facing.
Great article Chadi. I’ve always been very inspired by your basing work (Well, after I got over the whole Jealousy thing) and really appreciate the write up. I love the “pop” that a great base gives to a model, and it really adds a whole new dimension to the game when you can play with (or against!) well painted AND based models on the table!
Nicely done, man. I fully agree with you that a model isn’t finished until it’s based and based well at that. You can really dial up a mediocre model and paint job to 11 with a 1/2 decent base and your bases are full on decent! look forward to seeing your next article.
Great stuff Chadi! Great tips and lots of great ideas for people to think about!